Sometime back I was taught how to sharpen knives, and though the blades I worked with would shave hair easily, and many would consider them “scary” sharp. I frequently found myself frustrated with how fast the knives seemed to dull and I was never able to get them to “tree top” hair. After quite a bit of trial and error I ended up digging though way too much metal science on the internet and quickly found out what I had been taught, was unfortunately incorrect.
What I was taught to feel for, what my fingers learned to identify as sharp, was actually just a burr sitting on top of the apex of a blade. Not only does this explain why the knife could shave so easily, but also why it dulled so fast. Annoyingly enough there is a saying that the sharper the knife, the faster it dulls. This is wildly false, a refined edge won’t dull any faster than a working edge, what is happening is the burr sitting on top of the apex is not properly removed, and that burr easily deforms. Best case it folds over and rolls the edge, worst case, it deforms and cracks, taking a chunk of the edge with it.
After a fair amount of research, here is what I have learned, and what I can distill into a few key bullet points. This is by no means exhaustive, but this will tell you terms to look up. Also, if you are interested in a deep dive into how to turn a blade into a razor, stay tuned, that page is coming.
1
A knife without a burr will not feel “sharp” — it will feel smooth. The more refined your edge, the more “sticky” it will actually feel.
2
Burr removal is everything. If you are just getting started, get a jeweler’s loupe. You need something in the 90x range. With it, you will be able to see the burr sitting on the edge — generally what you are looking for is your scratch pattern to go all the way to the edge, without any shine on the apex.
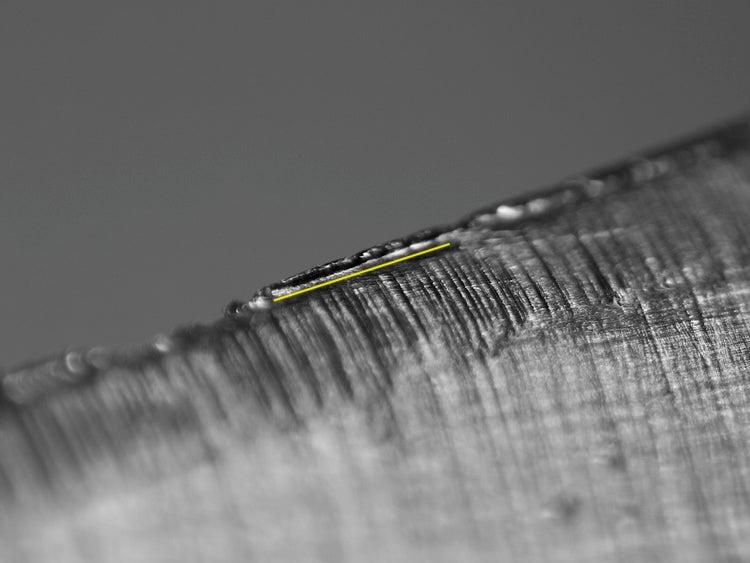
Burr
Scratch pattern visible below the yellow line. Everything above is burr and deformation.
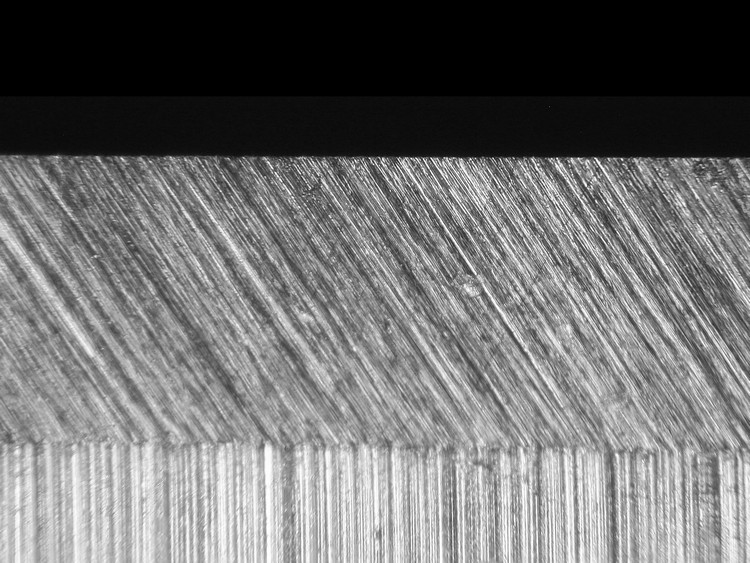
No Burr
Scratch pattern goes all the way to the end of the steel. This is what we are after.
In the first image, admittedly nasty, you will see a scratch pattern right below the yellow line. Everything above that, is burr and deformation. In the second image you will see the scratch pattern go to the end of the steel. This is what we are after.
3
Your edge does not need to have a mirror finish to whittle hair both ways. It just needs to be refined and have top tier burr removal. As far as I have discovered there is “burr removal”, and “edge refinement”. Burr removal can be done with stones or lapping films. Edge refinement needs something softer to get in between all the scratches and imperfections left behind by the stones. Enter, leather strops. An edge refined with a leather strop at 2 microns will whittle hair the easy way, taking it to one micron will whittle hair the hard way. I have taken 200 grit edges, removed the burr, and refined to hair whittling.
4
Geometry is just as meaningful as the edge angle for performance. Different blades have different grinds and different thickness at the spine and behind the edge. Pocket knives and cleavers can have a 20 degree edge, and feel like they are pushing through meat rather than cutting, whereas a Japanese knife can have a 30 degree edge and feel more “slicey”. The reason is that Japanese knife will be 1.2mm behind the edge, whereas that cleaver could be north of 2mm. The Japanese knife will also have a more gentle slope to the spine.
5
Angles are just as important with strops as they are with stones. A strop will roll an edge faster than poor cutting.
And that is really all there is to it. Cut an edge, apex it, remove burr, polish if you see fit, refine edge. In most cases if you have a 400 grit stone, a 1000 grit stone, and a strop, that is enough.